Thrifting Thursday 2-13-14 ~ A Spinning Display Fixture Tutorial for Under $10
GROW YOUR BLOG HOP & GIVEAWAY > HERE
Hello Thrifting Thursday Friends~
Welcome
I'm pretty excited to share today's post with you. You know by now that I amcheap frugal and love a good deal.
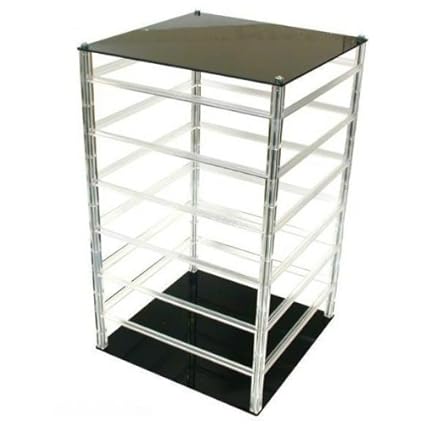
Last August I shared with you a post on making a display fixture from a thrift shop CD rack [See it here].
Overall I would say it worked...OK... but not great, so I put it on the shelf. It didn't hold quite enough and some pieces seemed lost against the dark background.
My DH tried to throw them away for me more than once... But I couldn't let them go, I knew there had to be a way.
 I broke down before Christmas, during my busiest show season. At the urging of my peers, I bought a traditional earring spinner from Amazon for $30. It works fine, but it's-----kinda tacky and extremely flimsy IMHO, I prefer a more earthy, organic feel to my 'shop'. I still use it though and I will continue to, until it dies...
So now here we are headed into the spring show season and I am once again re-thinking my displays. There, staring at me, were those two spinners and so I started tinkering....
I use big burlap covered foam core boards on easels with drapery hooks to display most of my pieces. So the leap here was not huge.
I went to Dollar Tree and bought a sheet of foam core and a roll of packing tape. I popped over to Hancock fabrics and bought two yards of natural burlap [on sale 50% off- Score!]


I measured and cut the foam core into 4 10x14in. sections. I cut it so it would be a tight fit under the lip that sticks out a bit on each side and placed it snugly on all 4 sides, then I used a piece of packing tape to secure 3 of the 4 sections, leaving one side open.

I removed the 4 piece, connected section and layed it on the burlap. I cut the fabric leaving an inch or two all the way around and using the packing tape, I 'gift wrapped' the fabric to the board, mitering the corners for a nice finish.


 <<All four sides secured.
I repeated the steps for the second and slightly smaller spinner rack I had on hand.

 Now I stacked the fixtures, smaller on top. I wanted to add an extra layer of security so I tied a length of brown grosgrain ribbon around the middle of each. Plus I think it adds a nice detail. This way if I ever need to take off the burlap sections to clean or replace them it will be possible. It's nice too that the racks still spin independently of one another. I am going to two part epoxy these two fixtures together so that this arrangement is permanent.


Hello Thrifting Thursday Friends~
Welcome
I'm pretty excited to share today's post with you. You know by now that I am
Last August I shared with you a post on making a display fixture from a thrift shop CD rack [See it here].
Overall I would say it worked...OK... but not great, so I put it on the shelf. It didn't hold quite enough and some pieces seemed lost against the dark background.
My DH tried to throw them away for me more than once... But I couldn't let them go, I knew there had to be a way.
 I broke down before Christmas, during my busiest show season. At the urging of my peers, I bought a traditional earring spinner from Amazon for $30. It works fine, but it's-----kinda tacky and extremely flimsy IMHO, I prefer a more earthy, organic feel to my 'shop'. I still use it though and I will continue to, until it dies...
So now here we are headed into the spring show season and I am once again re-thinking my displays. There, staring at me, were those two spinners and so I started tinkering....
I use big burlap covered foam core boards on easels with drapery hooks to display most of my pieces. So the leap here was not huge.
I went to Dollar Tree and bought a sheet of foam core and a roll of packing tape. I popped over to Hancock fabrics and bought two yards of natural burlap [on sale 50% off- Score!]
I measured and cut the foam core into 4 10x14in. sections. I cut it so it would be a tight fit under the lip that sticks out a bit on each side and placed it snugly on all 4 sides, then I used a piece of packing tape to secure 3 of the 4 sections, leaving one side open.
I removed the 4 piece, connected section and layed it on the burlap. I cut the fabric leaving an inch or two all the way around and using the packing tape, I 'gift wrapped' the fabric to the board, mitering the corners for a nice finish.


Then I wrapped the wrapped sides around the rack and wedged the board under the lip snugly.
<<All four sides secured.I repeated the steps for the second and slightly smaller spinner rack I had on hand.
Now I stacked the fixtures, smaller on top. I wanted to add an extra layer of security so I tied a length of brown grosgrain ribbon around the middle of each. Plus I think it adds a nice detail. This way if I ever need to take off the burlap sections to clean or replace them it will be possible. It's nice too that the racks still spin independently of one another. I am going to two part epoxy these two fixtures together so that this arrangement is permanent.
I threw this shot together just to give you an idea of the final product. I used drapery hooks [ like you see above] I had on hand to hang both link and bangle style bracelets and hole-punched business/hang cards I used for earrings and things. I simply slide the sharp point down through the burlap [but not the foam core].
The top seemed lacking so I added a wooden mug rack I have been using at shows [a previous thrift find- $2]. If I decide to keep that up there, I will epoxy it in place too to keep it secure. I'm still debating that since I can hang the bangles from hooks and that might be a cleaner look.
Over all I am thrilled with the way this turned out. I now have tons of vertical space which I can arrange any way I like just by moving the hooks around on all four side and people seem to love spinners when shopping. I have my first spring show this Saturday so this will get a test drive that day.
Fingers crossed!
Thanks for visiting today. I'd love to hear your feedback/opinions/suggestions
and I hope I may have inspired you too.
Warm Regards,
Tammie


That's a brilliant idea, I am just like you, love a bargain, look what I did with this corner unit http://earth-shinedesigns.blogspot.co.uk/2013/12/nine-days-of-christmas-fair-and-my-stand.html
ReplyDeleteLinda
Thanks...great idea. My FIRST show is March 1st. Must try this. Good luck with your show.
ReplyDeletekathy
That is a great idea!
ReplyDeleteThis looks great, Tammie :) Good luck with your show (hope the weather cooperates!)
ReplyDeleteWell first of all I like your idea and no harm in being frugal...leaves room for more beads! Second, my problem with that type do display is after the show...I've tried to plastic wrap my earring which didn't work..they fell off anyway...Marde
ReplyDeletePS love your blog page.
ReplyDeleteIngenious Love your blog. Good luck at the show
ReplyDelete