Mokume Gane Madness- US Navy edition
Today's fable is the story of a crafty Navy wife who loves polymer clay.
I've been a Navy wife for close to 20 years and one of the many things I love about this life are the traditions. Many are big & bold and have a long history but some are small and come around only once a year.
In military spouse clubs at Christmas time there is a tradition of having an ornament exchange, a type of chinese auction or yankee swap if you will. The secret of course is to have to most sought after ornament, the one everyone wishes they had won.
As you can guess in our helicopter aviation group 'helos' and Navy themed items are big winners. As an artist, and a big fan of polymer clay I thought I could pull off a unique, one of a kind and sought after Mokume Gane ornament with a NAVY twist.
As you can guess in our helicopter aviation group 'helos' and Navy themed items are big winners. As an artist, and a big fan of polymer clay I thought I could pull off a unique, one of a kind and sought after Mokume Gane ornament with a NAVY twist.
Here is my process:


 Out it pops perfectly


Next I began to work the colors for my mokume gane. I chose a translucent. a deep gold, jewelry gold, & a navy blue. Manipulate, warm, roll, and run through the pasta machine at gradually reducing thicknesses. I am sort of a messy worker, but mokume is forgiving and still comes out well even if you are not perfect.
 Begin to cut the clay into pieces for layering.


 Start stacking the layers as desired

 Choose your weapons! An old faux credit card makes a great tool. By cutting in this way and then cross hatching you get a very pretty lacy web effect.


 Firmly compress the cut clay back into a cube by pressing on all sides

 Now, let's poke some hole! This old wine stopper makes a great bulls eye effect


 Once you are satisfied, place your block in the freezer for about an hour.
 After freezing, take your tissue blade and begin slicing very thin layers from what was the original horizontal top surface of the block. I often lay it on it's 'side' and cut downward letting gravity help me do the work.


 Lay all the slices out on parchment or waxed paper for easy lifting. Once it is sliced it will warm and re-soften.

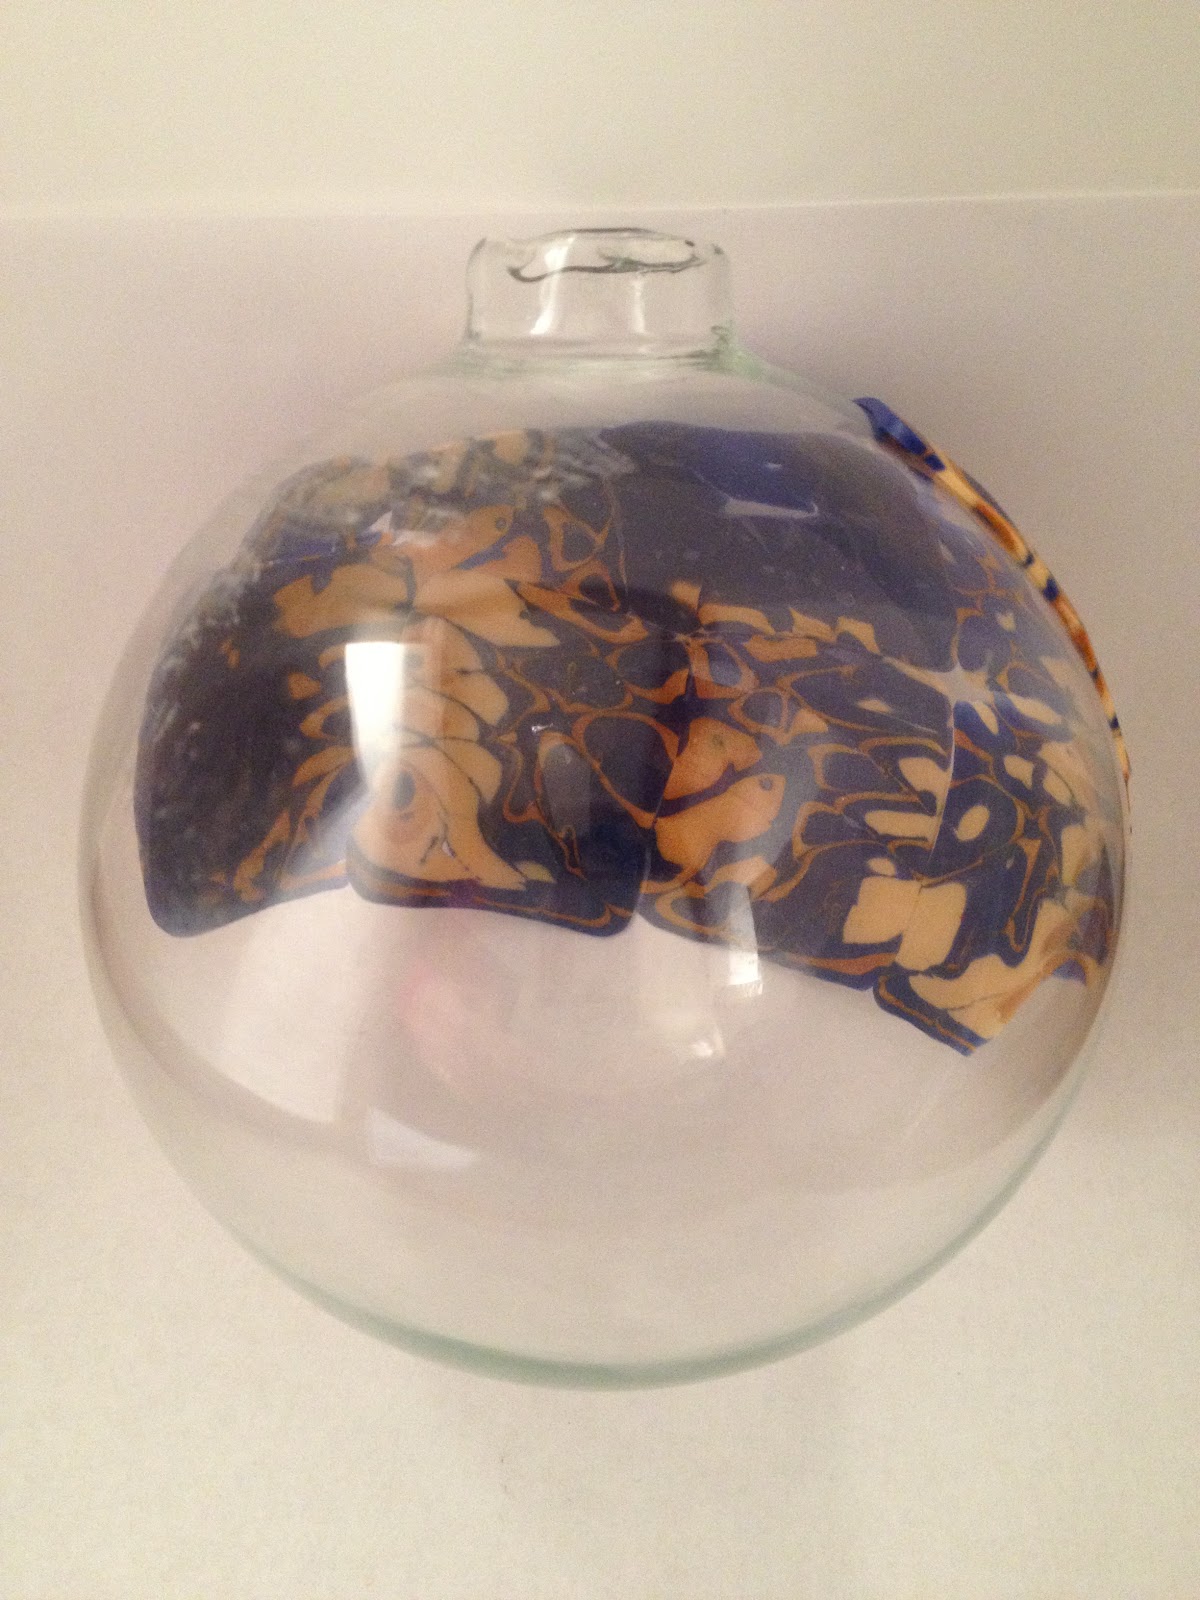
 Carefully remove the metal hanger and begin to apply the thin clay layers to your surface. You can apply a thin layer of liquid clay first if you like, but I felt for this ornament it was not needed.
 As you add the sections, use a roller


 Using a small dab of liquid clay in between, apply the clay wings
 Bake on a pillow of batting in your oven according the the product directions for the brand of clay you are using. Premo! Sculpey®
RSVP to attend your squadrons ornament exchange
Thanks for taking your time to join me today.
 |
| I prefer Premo by Sculpey |
I started by using a 'Naval Aviator Wings' candy mold I have had for many years. I dusted the mold with baby powder and pressed in a log of warmed and softened jewelry gold polymer.


Next I began to work the colors for my mokume gane. I chose a translucent. a deep gold, jewelry gold, & a navy blue. Manipulate, warm, roll, and run through the pasta machine at gradually reducing thicknesses. I am sort of a messy worker, but mokume is forgiving and still comes out well even if you are not perfect.
Begin to cut the clay into pieces for layering.

 Start stacking the layers as desired
Trim the stack to neaten it 

 Choose your weapons! An old faux credit card makes a great tool. By cutting in this way and then cross hatching you get a very pretty lacy web effect.

 Firmly compress the cut clay back into a cube by pressing on all sides
 |
| Big nail, wine stopper, bone folder, fondue fork, wavy blade, pottery tool |
 Now, let's poke some hole! This old wine stopper makes a great bulls eye effect

Once again, compress the cube very firmly. Feel free to poke, cut and compress as much or as little as desired. All sorts of tools, as shown above can be used.
 Once you are satisfied, place your block in the freezer for about an hour.
 After freezing, take your tissue blade and begin slicing very thin layers from what was the original horizontal top surface of the block. I often lay it on it's 'side' and cut downward letting gravity help me do the work.


 Lay all the slices out on parchment or waxed paper for easy lifting. Once it is sliced it will warm and re-soften.
 Carefully remove the metal hanger and begin to apply the thin clay layers to your surface. You can apply a thin layer of liquid clay first if you like, but I felt for this ornament it was not needed.
 As you add the sections, use a roller
[I use an old glass test tube] to roll the sections together, fill in cracks and smooth surface as much as possible. I don't like sanding, so I work hard to get it as smooth as possible before baking. Continue covering the surface until the whole globe is covered and smoothed out.
Take the globe in your two hands and gently but firmly roll it all around to warm and smooth the ball as much as you can.

 Using a small dab of liquid clay in between, apply the clay wings
 Bake on a pillow of batting in your oven according the the product directions for the brand of clay you are using. Premo! Sculpey®
275 °F (130 °C) 30 min/ 1/4 in (6 mm) thickness
Once baked, cool completely. Sand as needed [If I did a good job smoothing, sanding should be minimal], wipe with damp paper towel to remove any dust. Seal with 2 thin coats of Future floor finish or your favorite clay compatible sealer.
 |
| Photo by Caitlyn Chance |
Sit back and see if your creation is the most 'stolen' item of the day......
Thanks for taking your time to join me today.
Warmest Regards,
Tammie Everly


Awesome post! Love that ornament and I really hope it ends up being the most stolen ornament!
ReplyDeleteThat is just the neatest thing! I need one, but the problem is finding the mold for the wings!! Where on earth can I get one of those? My son's winging is coming up this fall and I'd love to have a mold like that to make something special.
ReplyDeleteWhere can I find a mold like that? That's a beautiful project.
ReplyDeleteHi there! I would love to know where you found the naval aviator wings mold if you still know! My husband is winging soon and I would love to use it for chocolate treats! Thanks in advance!
ReplyDelete